
티스토리 뷰
15 Terraform을 사용하여 Azure Kubernetes Service로 Kubernetes 클러스터 만들기
zerobig-k8s 2020. 1. 20. 07:59<참조>
https://docs.microsoft.com/ko-kr/azure/terraform/terraform-create-k8s-cluster-with-tf-and-aks
https://docs.microsoft.com/en-us/azure/terraform/terraform-create-k8s-cluster-with-tf-and-aks
이번 자습서에서는 Terraform을 사용하여 Azure Kubernetes Service로 Kubernetes 클러스터를 생성하여 간단히 테스트 하고 대시보드를 띄어보는 내용에 대해 다루어 본다.
- HCL(HashiCorp Language)을 사용하여 Kubernetes 클러스터 정의
- Terraform 및 AKS를 사용하여 Kubernetes 클러스터 만들기
- kubectl 도구를 사용하여 Kubernetes 클러스터의 가용성 테스트 및 대시보드 띄우기
AKS(Azure Kubernetes Service)는 호스트된 Kubernetes 환경을 관리한다. AKS를 사용하면 컨테이너 오케스트레이션 전문 지식 없이도 컨테이너화된 애플리케이션을 배포 및 관리할 수 있다. AKS를 사용하면 앱을 오프라인 상태로 전환하지 않고도 많은 일반적인 유지 관리 작업을 수행할 수 있다. 이러한 작업에는 주문형 리소스 프로비저닝, 업그레이드 및 확장이 포함된다.
필수 조건
-
Azure 구독: Azure 구독이 아직 없는 경우 시작하기 전에 체험 계정을 만든다.
-
Terraform 구성: 이전 실습 Azure의 Terraform을 확인한다.
-
Azure 서비스 주체: 이전 실습 Azure의 Terraform을 확인한다. appId, displayName, 암호, 테넌트를 기록해 둔다.
서비스 주체 자격 증명에 대해 생소하다면, 여기를 참조한다.
디렉터리 구조 만들기
실습할 디렉토리를 생성하고 마우스 오른쪽 버튼을 클릭하여 "Code(으)로 열기"를 선택한다.
생성한 실습 디렉토리 이하에 terraform-aks-k8s 디렉토리를 생성한 뒤 해당 디렉토리로 이동한다.

Azure 공급자 선언
Azure 공급자를 선언하는 Terraform 구성 파일을 만든다.
1. main.tf 라는 파일을 만든다.
2. 다음 코드를 붙여넣는다.
|
provider "azurerm" { version = "~>1.5" }
terraform { backend "azurerm" {} } |
3. 파일을 저장한다.
Kubernetes 클러스터 정의
Kubernetes 클러스터용 리소스를 선언하는 Terraform 구성 파일을 만든다.
1. k8s.tf 라는 파일을 만든다.
2. 다음 코드를 붙여넣는다.
|
resource "azurerm_resource_group" "k8s" { name = var.resource_group_name location = var.location }
resource "random_id" "log_analytics_workspace_name_suffix" { byte_length = 8 }
resource "azurerm_log_analytics_workspace" "test" { # The WorkSpace name has to be unique across the whole of azure, not just the current subscription/tenant. name = "${var.log_analytics_workspace_name}-${random_id.log_analytics_workspace_name_suffix.dec}" location = var.log_analytics_workspace_location resource_group_name = azurerm_resource_group.k8s.name sku = var.log_analytics_workspace_sku }
resource "azurerm_log_analytics_solution" "test" { solution_name = "ContainerInsights" location = azurerm_log_analytics_workspace.test.location resource_group_name = azurerm_resource_group.k8s.name workspace_resource_id = azurerm_log_analytics_workspace.test.id workspace_name = azurerm_log_analytics_workspace.test.name
plan { publisher = "Microsoft" product = "OMSGallery/ContainerInsights" } }
resource "azurerm_kubernetes_cluster" "k8s" { name = var.cluster_name location = azurerm_resource_group.k8s.location resource_group_name = azurerm_resource_group.k8s.name dns_prefix = var.dns_prefix
linux_profile { admin_username = "ubuntu"
ssh_key { key_data = file(var.ssh_public_key) } }
default_node_pool { name = "agentpool" node_count = var.agent_count vm_size = "Standard_DS1_v2" }
service_principal { client_id = var.client_id client_secret = var.client_secret }
addon_profile { oms_agent { enabled = true log_analytics_workspace_id = azurerm_log_analytics_workspace.test.id } }
tags = { Environment = "Development" } } |
위의 코드는 클러스터의 이름, 위치 및 리소스 그룹 이름을 설정한다. FQDN(정규화된 도메인 이름)의 접두사도 설정된다. FQDN은 클러스터에 액세스하는 데 사용된다.
linux_profile 레코드를 사용하면 SSH를 사용하여 워커 노드에 로그인할 수 있는 설정을 구성할 수 있다.
AKS를 사용하면 워커 노드에 대해서만 지불한다. default_node_pool 레코드는 이러한 워커 노드에 대한 세부 정보를 구성한다. default_node_pool record에는 만들 워커 노드 수와 워커 노드 유형이 포함된다. 나중에 클러스터를 확장하거나 축소해야 하는 경우, 이 레코드에서 count 값을 수정한다.
3. 파일을 저장한다.
변수 선언
1. variables.tf 라는 파일을 만든다.
2. 다음 코드를 붙여넣는다.
- dns_prefix, cluster_name 등은 각자의 상황에 맞게 수정한다. 단, dns_prefix는 Unique한 값이어야 한다.
|
variable "client_id" {} variable "client_secret" {}
variable "agent_count" { default = 3 }
variable "ssh_public_key" { default = "~/.ssh/id_rsa.pub" }
variable "dns_prefix" { default = "zerok8sdemo" }
variable cluster_name { default = "zerok8sdemo" }
variable resource_group_name { default = "azure-k8sdemo" }
variable location { default = "Korea Central" }
variable log_analytics_workspace_name { default = "testLogAnalyticsWorkspaceName" }
# refer https://azure.microsoft.com/global-infrastructure/services/?products=monitor for log analytics available regions variable log_analytics_workspace_location { default = "koreacentral" }
# refer https://azure.microsoft.com/pricing/details/monitor/ for log analytics pricing variable log_analytics_workspace_sku { default = "PerGB2018" } |
3. 파일을 저장한다.
Terraform 출력 파일 만들기
Terraform 출력을 사용하면 Terraform이 계획을 적용할 때 사용자에게 강조 표시되는 값 및 terraform output 명령을 사용하여 쿼리할 수 있는 값을 정의할 수 있다. 이 섹션에서는 kubectl 도구를 사용하여 클러스터 액세스를 허용하는 출력 파일을 만든다.
1. output.tf 라는 파일을 만든다.
2. 다음 코드를 붙여넣는다.
|
output "client_key" { value = azurerm_kubernetes_cluster.k8s.kube_config.0.client_key }
output "client_certificate" { value = azurerm_kubernetes_cluster.k8s.kube_config.0.client_certificate }
output "cluster_ca_certificate" { value = azurerm_kubernetes_cluster.k8s.kube_config.0.cluster_ca_certificate }
output "cluster_username" { value = azurerm_kubernetes_cluster.k8s.kube_config.0.username }
output "cluster_password" { value = azurerm_kubernetes_cluster.k8s.kube_config.0.password }
output "kube_config" { value = azurerm_kubernetes_cluster.k8s.kube_config_raw }
output "host" { value = azurerm_kubernetes_cluster.k8s.kube_config.0.host } |
3. 파일을 저장한다.
Terraform 상태를 저장하도록 Azure Storage 설정
Terraform은 terraform.tfstate 파일을 통해 로컬로 상태를 추적한다. 이 패턴은 단일 작업자 환경에서 잘 작동한다. 다중 사용자 환경에서 Azure 스토리지는 상태를 추적하는 데 사용된다.
이 섹션에서는 다음 작업을 수행하는 방법을 보여준다.
- 스토리지 계정 정보 검색(계정 이름 및 계정 키)
- Terraform 상태 정보가 저장되는 스토리지 컨테이너를 만든다.
1. Azure Portal에서 메뉴 중 스토리지 계정(Storage accounts)을 선택한다.

2. 스토리지 계정 탭에서 Terraform가 상태를 저장하도록 설정할 스토리지 계정을 하나 새로 만들기 위해 +Add를 선택한다.
Storage account name 필드에 고유한 적절값을 입력하고 Review + Create를 누른다.

선택한 스토리지 계정을 기록해 둔다. 이 값은 나중에 필요하다.
3. [스토리지 계정] 탭에서 액세스 키를 선택하여 key1 key 값을 기록해 둔다. 이 값은 나중에 필요하다.

4. Azure 스토리지 계정에 컨테이너를 만든다. 자리 표시자(placeholders)를 사용자 환경에 적합한 값으로 바꾼다.
| az storage container create --name tfstate --account-name <YourAzureStorageAccountName> --account-key <YourAzureStorageAccountKey> |
zerobig@ZEROBIG-NT800:/mnt/d/Azure_DevOps_Study/20200119/terraform-aks-k8s$ az storage container create --name tfstate --account-name 4tfstate --account-key xxxxxxxxxxxxxxxxxxxxxxxxxxxxxxxxxxxxxxxxxxxxxxxxxxxxxxxxx
{
  "created": true
}
Kubernetes 클러스터를 만들기
이 섹션에서는 terraform init 명령을 사용하여 이전 섹션에서 만든 구성 파일을 정의하는 리소스를 만드는 방법을 보여 준다.
1. Terraform을 초기화합한다. 자리 표시자를 사용자 환경에 적합한 값으로 바꾼다.
|
terraform init -backend-config="storage_account_name=<YourAzureStorageAccountName>" -backend-config="container_name=tfstate" -backend-config="access_key=<YourStorageAccountAccessKey>" -backend-config="key=codelab.microsoft.tfstate" |
terraform init 명령은 백 엔드 및 공급자 플러그 인 초기화 성공을 표시한다.
zerobig@ZEROBIG-NT800:/mnt/d/Azure_DevOps_Study/20200119/terraform-aks-k8s$ terraform init -backend-config="storage_account_name=4tfstate" -backend-config="container_name=tfstate" -backend-config="access_key=xxxxxxxxxxxxxxxxxxxxxxxxxxxxxxxxxxxxxxxxxxxxxxxxxxxxxxxxx" -backend-config="key=codelab.microsoft.tfstate"

Initializing the backend...

Successfully configured the backend "azurerm"! Terraform will automatically
use this backend unless the backend configuration changes.

Initializing provider plugins...
- Checking for available provider plugins...
- Downloading plugin for provider "azurerm" (hashicorp/azurerm) 1.41.0...
- Downloading plugin for provider "random" (hashicorp/random) 2.2.1...

The following providers do not have any version constraints in configuration,
so the latest version was installed.

To prevent automatic upgrades to new major versions that may contain breaking
changes, it is recommended to add version = "..." constraints to the
corresponding provider blocks in configuration, with the constraint strings
suggested below.

* provider.random: version = "~> 2.2"

Terraform has been successfully initialized!

You may now begin working with Terraform. Try running "terraform plan" to see
any changes that are required for your infrastructure. All Terraform commands
should now work.

If you ever set or change modules or backend configuration for Terraform,
rerun this command to reinitialize your working directory. If you forget, other
commands will detect it and remind you to do so if necessary.
2. 서비스 주체 자격 증명 내보내기 자리 표시자를 서비스 주체의 적절한 값으로 바꾼다.
| export TF_VAR_client_id=<service-principal-appid> export TF_VAR_client_secret=<service-principal-password> |
zerobig@ZEROBIG-NT800:/mnt/d/Azure_DevOps_Study/20200119/terraform-aks-k8s$ export TF_VAR_client_id=8c22bed5-xxxx-xxxx-xxxx-3366d7347b24
zerobig@ZEROBIG-NT800:/mnt/d/Azure_DevOps_Study/20200119/terraform-aks-k8s$ export TF_VAR_client_secret=0e8a6688-xxxx-xxxx-xxxx-1b607d55fa2f
service-principal-password의 값을 기억하지 못하는 경우 다음과 같이 초기화 할 수 있다.
zerobig@ZEROBIG-NT800:/mnt/d/Azure_DevOps_Study/20200119/terraform-aks-k8s$ az ad app credential reset --id 8c22bed5-xxxx-xxxx-xxxx-3366d7347b24
{
  "appId": "8c22bed5-xxxx-xxxx-xxxx-3366d7347b24",
  "name": "8c22bed5-0a7f-4cc0-a988-3366d7347b24",
  "password": "0e8a6688-xxxx-xxxx-xxxx-1b607d55fa2f",
  "tenant": "917bfe84-xxxx-xxxx-xxxx-236e41ceafe9"
}
3. terraform plan 명령을 실행하여 인프라 요소를 정의하는 Terraform 계획을 만든다.
| terraform plan -out out.plan |
zerobig@ZEROBIG-NT800:/mnt/d/Azure_DevOps_Study/20200119/terraform-aks-k8s$ terraform plan -out out.plan
Acquiring state lock. This may take a few moments...
Refreshing Terraform state in-memory prior to plan...
The refreshed state will be used to calculate this plan, but will not be
persisted to local or remote state storage.


------------------------------------------------------------------------

An execution plan has been generated and is shown below.
Resource actions are indicated with the following symbols:
  + create

Terraform will perform the following actions:

  # azurerm_kubernetes_cluster.k8s will be created
  + resource "azurerm_kubernetes_cluster" "k8s" {
      + dns_prefix                 = "zerok8sdemo"
      + enable_pod_security_policy = (known after apply)
      + fqdn                       = (known after apply)
      + id                         = (known after apply)
      + kube_admin_config          = (known after apply)
      + kube_admin_config_raw      = (sensitive value)
      + kube_config                = (known after apply)
      + kube_config_raw            = (sensitive value)
      + kubernetes_version         = (known after apply)
      + location                   = "koreacentral"
      + name                       = "zerok8sdemo"
      + node_resource_group        = (known after apply)
      + private_fqdn               = (known after apply)
      + resource_group_name        = "azure-k8sdemo"
      + tags                       = {
          + "Environment" = "Development"
        }

      + addon_profile {

          + oms_agent {
              + enabled                    = true
              + log_analytics_workspace_id = (known after apply)
            }
        }

      + agent_pool_profile {
          + availability_zones    = (known after apply)
          + count                 = (known after apply)
          + dns_prefix            = (known after apply)
          + enable_auto_scaling   = (known after apply)
          + enable_node_public_ip = (known after apply)
          + fqdn                  = (known after apply)
          + max_count             = (known after apply)
          + max_pods              = (known after apply)
          + min_count             = (known after apply)
          + name                  = (known after apply)
          + node_taints           = (known after apply)
          + os_disk_size_gb       = (known after apply)
          + os_type               = (known after apply)
          + type                  = (known after apply)
          + vm_size               = (known after apply)
          + vnet_subnet_id        = (known after apply)
        }

      + default_node_pool {
          + max_pods        = (known after apply)
          + name            = "agentpool"
          + node_count      = 3
          + os_disk_size_gb = (known after apply)
          + type            = "VirtualMachineScaleSets"
          + vm_size         = "Standard_DS1_v2"
        }

      + linux_profile {
          + admin_username = "ubuntu"

          + ssh_key {
              + key_data = "ssh-rsa AAAAB3NzaC1yc2EAAAADAQABAAABAQCttszvheNvmlgaKGf9t2L1mT2bDMhGHCPbGvo9Ys1lSgBjK+FsOIK+v5J2so9G7JhSZ26EWHqeGqD3NpR9moDN0MzG9NsYwfyxQ4A+qQk0Z4mHvyykUz36X5cjBGBcLU/HThi063KRF3r1i2y3XRheTE6vFuZyJ7ixV8vLWprzqBvmHJpqcNf+ckkc6cidM4688RacVVctDyafWfDQwXrQPxTnHl2VW03zZH9jafzrwaCMgSYEL44kzuwBe9WusDS4ZgSfneHJy1ZgfoE6bf9NGEuEHFi80fTRkSQWvJlMU8pkwMraqJnJnwbHZgGp+ApBxuU35g0OAzXVhYR8fToT zerobig.kim@gmail.com\n"
            }
        }

      + network_profile {
          + dns_service_ip     = (known after apply)
          + docker_bridge_cidr = (known after apply)
          + load_balancer_sku  = (known after apply)
          + network_plugin     = (known after apply)
          + network_policy     = (known after apply)
          + pod_cidr           = (known after apply)
          + service_cidr       = (known after apply)
        }

      + role_based_access_control {
          + enabled = (known after apply)

          + azure_active_directory {
              + client_app_id     = (known after apply)
              + server_app_id     = (known after apply)
              + server_app_secret = (sensitive value)
              + tenant_id         = (known after apply)
            }
        }

      + service_principal {
          + client_id     = "8c22bed5-0a7f-4cc0-a988-3366d7347b24"
          + client_secret = (sensitive value)
        }
    }

  # azurerm_log_analytics_solution.test will be created
  + resource "azurerm_log_analytics_solution" "test" {
      + id                    = (known after apply)
      + location              = "koreacentral"
      + resource_group_name   = "azure-k8sdemo"
      + solution_name         = "ContainerInsights"
      + workspace_name        = (known after apply)
      + workspace_resource_id = (known after apply)

      + plan {
          + name      = (known after apply)
          + product   = "OMSGallery/ContainerInsights"
          + publisher = "Microsoft"
        }
    }

  # azurerm_log_analytics_workspace.test will be created
  + resource "azurerm_log_analytics_workspace" "test" {
      + id                   = (known after apply)
      + location             = "koreacentral"
      + name                 = (known after apply)
      + portal_url           = (known after apply)
      + primary_shared_key   = (sensitive value)
      + resource_group_name  = "azure-k8sdemo"
      + retention_in_days    = (known after apply)
      + secondary_shared_key = (sensitive value)
      + sku                  = "PerGB2018"
      + tags                 = (known after apply)
      + workspace_id         = (known after apply)
    }

  # azurerm_resource_group.k8s will be created
  + resource "azurerm_resource_group" "k8s" {
      + id       = (known after apply)
      + location = "koreacentral"
      + name     = "azure-k8sdemo"
      + tags     = (known after apply)
    }

  # random_id.log_analytics_workspace_name_suffix will be created
  + resource "random_id" "log_analytics_workspace_name_suffix" {
      + b64         = (known after apply)
      + b64_std     = (known after apply)
      + b64_url     = (known after apply)
      + byte_length = 8
      + dec         = (known after apply)
      + hex         = (known after apply)
      + id          = (known after apply)
    }

Plan: 5 to add, 0 to change, 0 to destroy.

------------------------------------------------------------------------

This plan was saved to: out.plan

To perform exactly these actions, run the following command to apply:
    terraform apply "out.plan"
4. terraform apply 명령을 실행하여 Kubernetes 클러스터를 만들 계획에 적용한다. Kubernetes 클러스터를 만드는 프로세스는 몇 분 정도 소요될 수도 있다.
| terraform apply out.plan |
terraform apply 명령은 구성 파일에 정의된 리소스 만들기의 결과를 표시한다.
zerobig@ZEROBIG-NT800:/mnt/d/Azure_DevOps_Study/20200119/terraform-aks-k8s$ terraform apply out.plan
Acquiring state lock. This may take a few moments...
random_id.log_analytics_workspace_name_suffix: Creating...
random_id.log_analytics_workspace_name_suffix: Creation complete after 0s [id=bsgRFTWnADI]
azurerm_resource_group.k8s: Creating...
azurerm_resource_group.k8s: Creation complete after 0s [id=/subscriptions/f8764f39-xxxx-xxxx-xxxx-77b286ed971b/resourceGroups/azure-k8sdemo]
azurerm_log_analytics_workspace.test: Creating...
azurerm_log_analytics_workspace.test: Still creating... [10s elapsed]
azurerm_log_analytics_workspace.test: Still creating... [20s elapsed]
azurerm_log_analytics_workspace.test: Still creating... [30s elapsed]
azurerm_log_analytics_workspace.test: Still creating... [40s elapsed]
azurerm_log_analytics_workspace.test: Still creating... [50s elapsed]
azurerm_log_analytics_workspace.test: Still creating... [1m0s elapsed]
azurerm_log_analytics_workspace.test: Creation complete after 1m9s [id=/subscriptions/f8764f39-xxxx-xxxx-xxxx-77b286ed971b/resourcegroups/azure-k8sdemo/providers/microsoft.operationalinsights/workspaces/testloganalyticsworkspacename-7982649122306326578]
azurerm_log_analytics_solution.test: Creating...
azurerm_kubernetes_cluster.k8s: Creating...
azurerm_log_analytics_solution.test: Creation complete after 1s [id=/subscriptions/f8764f39-xxxx-xxxx-xxxx-77b286ed971b/resourcegroups/azure-k8sdemo/providers/Microsoft.OperationsManagement/solutions/ContainerInsights(testLogAnalyticsWorkspaceName-7982649122306326578)]
azurerm_kubernetes_cluster.k8s: Still creating... [10s elapsed]
azurerm_kubernetes_cluster.k8s: Still creating... [20s elapsed]
azurerm_kubernetes_cluster.k8s: Still creating... [30s elapsed]
azurerm_kubernetes_cluster.k8s: Still creating... [40s elapsed]
azurerm_kubernetes_cluster.k8s: Still creating... [50s elapsed]
azurerm_kubernetes_cluster.k8s: Still creating... [1m0s elapsed]
azurerm_kubernetes_cluster.k8s: Still creating... [1m10s elapsed]
azurerm_kubernetes_cluster.k8s: Still creating... [1m20s elapsed]
azurerm_kubernetes_cluster.k8s: Still creating... [1m30s elapsed]
azurerm_kubernetes_cluster.k8s: Still creating... [1m40s elapsed]
azurerm_kubernetes_cluster.k8s: Still creating... [1m50s elapsed]
azurerm_kubernetes_cluster.k8s: Still creating... [2m0s elapsed]
azurerm_kubernetes_cluster.k8s: Still creating... [2m10s elapsed]
azurerm_kubernetes_cluster.k8s: Still creating... [2m20s elapsed]
azurerm_kubernetes_cluster.k8s: Still creating... [2m30s elapsed]
azurerm_kubernetes_cluster.k8s: Still creating... [2m40s elapsed]
azurerm_kubernetes_cluster.k8s: Still creating... [2m50s elapsed]
azurerm_kubernetes_cluster.k8s: Still creating... [3m0s elapsed]
azurerm_kubernetes_cluster.k8s: Still creating... [3m10s elapsed]
azurerm_kubernetes_cluster.k8s: Still creating... [3m20s elapsed]
azurerm_kubernetes_cluster.k8s: Still creating... [3m30s elapsed]
azurerm_kubernetes_cluster.k8s: Still creating... [3m40s elapsed]
azurerm_kubernetes_cluster.k8s: Still creating... [3m50s elapsed]
azurerm_kubernetes_cluster.k8s: Still creating... [4m0s elapsed]
azurerm_kubernetes_cluster.k8s: Still creating... [4m10s elapsed]
azurerm_kubernetes_cluster.k8s: Still creating... [4m20s elapsed]
azurerm_kubernetes_cluster.k8s: Still creating... [4m30s elapsed]
azurerm_kubernetes_cluster.k8s: Still creating... [4m40s elapsed]
azurerm_kubernetes_cluster.k8s: Still creating... [4m50s elapsed]
azurerm_kubernetes_cluster.k8s: Still creating... [5m0s elapsed]
azurerm_kubernetes_cluster.k8s: Still creating... [5m10s elapsed]
azurerm_kubernetes_cluster.k8s: Still creating... [5m20s elapsed]
azurerm_kubernetes_cluster.k8s: Still creating... [5m30s elapsed]
azurerm_kubernetes_cluster.k8s: Still creating... [5m40s elapsed]
azurerm_kubernetes_cluster.k8s: Still creating... [5m50s elapsed]
azurerm_kubernetes_cluster.k8s: Still creating... [6m0s elapsed]
azurerm_kubernetes_cluster.k8s: Still creating... [6m10s elapsed]
azurerm_kubernetes_cluster.k8s: Still creating... [6m20s elapsed]
azurerm_kubernetes_cluster.k8s: Still creating... [6m30s elapsed]
azurerm_kubernetes_cluster.k8s: Still creating... [6m40s elapsed]
azurerm_kubernetes_cluster.k8s: Still creating... [6m50s elapsed]
azurerm_kubernetes_cluster.k8s: Still creating... [7m0s elapsed]
azurerm_kubernetes_cluster.k8s: Still creating... [7m10s elapsed]
azurerm_kubernetes_cluster.k8s: Still creating... [7m20s elapsed]
azurerm_kubernetes_cluster.k8s: Still creating... [7m30s elapsed]
azurerm_kubernetes_cluster.k8s: Still creating... [7m40s elapsed]
azurerm_kubernetes_cluster.k8s: Still creating... [7m50s elapsed]
azurerm_kubernetes_cluster.k8s: Still creating... [8m0s elapsed]
azurerm_kubernetes_cluster.k8s: Creation complete after 8m6s [id=/subscriptions/f8764f39-xxxx-xxxx-xxxx-77b286ed971b/resourcegroups/azure-k8sdemo/providers/Microsoft.ContainerService/managedClusters/zerok8sdemo]

Apply complete! Resources: 5 added, 0 changed, 0 destroyed.

Outputs:

client_certificate = LS0tLS1CRUdJTiBDRVJUSUZJQ0FURS0tLS0tCk1JSUUvRENDQXVTZ0F3<중략>UZJQ0FURS0tLS0tCg==
client_key = LS0tLS1CRUdJTiBSU0EgUFJJVkFURSBLRVktLS0tLQpNSUlKS0FJQkFBS0NBZ0VB<중략>UgS0VZLS0tLS0K
cluster_ca_certificate = LS0tLS1CRUdJTiBDRVJUSUZJQ0FURS0tLS0tCk1JSUVVORCBDRVJ<중략>UZJQ0FURS0tLS0tCg==
cluster_password = dd831784ce6f9fbef0f1dbd10d6f4c7e...<이하 생략>
cluster_username = clusterUser_azure-k8sdemo_zerok8sdemo
host = https://zerok8sdemo-d07efe6e.hcp.koreacentral.azmk8s.io:443
kube_config = apiVersion: v1
clusters:
- cluster:
    certificate-authority-data: LS0tLS1CRUdJTiBDRVJUSUZJQ0F<중략>g==
    server: https://zerok8sdemo-d07efe6e.hcp.koreacentral.azmk8s.io:443
  name: zerok8sdemo
contexts:
- context:
    cluster: zerok8sdemo
    user: clusterUser_azure-k8sdemo_zerok8sdemo
  name: zerok8sdemo
current-context: zerok8sdemo
kind: Config
preferences: {}
users:
- name: clusterUser_azure-k8sdemo_zerok8sdemo
  user:
    client-certificate-data: LS0tLS1CRUdJTiBDRVJUSUZJQ0FURS0t<중략>UUvRENDQXVTZ0F3SUJBZ0l
Apply complete! Resources: 2 added, 0 changed, 0 destroyed.
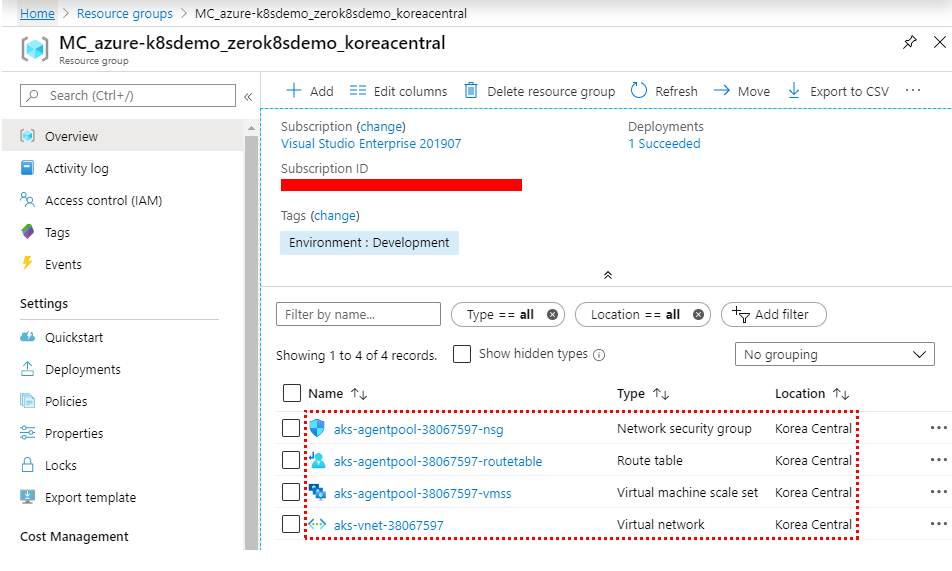
5. Azure Portal에서 Kubernetes 클러스터 생성 결과를 확인한다.

Kubernetes 클러스터 테스트
새로 만든 클러스터를 Kubernetes 도구를 사용해 확인할 수 있다.
1. Terraform 상태에서 Kubernetes 구성을 가져오고 이를 kubectl이 읽을 수 있는 파일에 저장한다.
| echo "$(terraform output kube_config)" > ./azurek8s |
zerobig@ZEROBIG-NT800:/mnt/d/Azure_DevOps_Study/20200119/terraform-aks-k8s$ echo "$(terraform output kube_config)" > ./azurek8s
2. kubectl이 올바른 구성을 선택할 수 있도록 환경 변수를 설정한다.
| export KUBECONFIG=./azurek8s |
zerobig@ZEROBIG-NT800:/mnt/d/Azure_DevOps_Study/20200119/terraform-aks-k8s$ export KUBECONFIG=./azurek8s
3. 클러스터 상태를 확인한다.
| kubectl get nodes |
zerobig@ZEROBIG-NT800:/mnt/d/Azure_DevOps_Study/20200119/terraform-aks-k8s$ kubectl get nodes
NAME                                STATUS   ROLES   AGE   VERSION
aks-agentpool-38067597-vmss000000   Ready    agent   10m   v1.14.8
aks-agentpool-38067597-vmss000001   Ready    agent   10m   v1.14.8
aks-agentpool-38067597-vmss000002   Ready    agent   10m   v1.14.8
작업자 노드의 세부 정보가 표시된다. 노드는 다음 이미지에 나온 대로 모두 Ready상태여야 한다.
4. 다음 명령을 수행하여 대시보드를 띄워 확인한다.
| az aks browse --resource-group azure-k8sdemo --name zerok8sdemo |
zerobig@ZEROBIG-NT800:/mnt/d/Azure_DevOps_Study/20200119/terraform-aks-k8s$ az aks browse --resource-group azure-k8sdemo --name zerok8sdemo
Merged "zerok8sdemo" as current context in /tmp/tmp1c51elhq
Proxy running on http://127.0.0.1:8001/
Press CTRL+C to close the tunnel...
상태 및 로그 모니터링
AKS 클러스터가 생성될 때 클러스터 노드와 Pod의 상태 메트릭을 캡처하기 위해 모니터링이 설정되었다. 이 상태 메트릭은 Azure Portal에서 사용할 수 있다. 컨테이너 상태 모니터링에 대한 자세한 내용은 Azure Kubernetes Service 상태 모니터링을 참조한다.
'Azure와 함께 하는 DevOps' 카테고리의 다른 글
| 17 모듈 레지스트리를 사용하여 Terraform으로 Azure VM 클러스터 만들기 (0) | 2020.02.03 |
|---|---|
| 16 Terraform을 사용하여 Azure Kubernetes Service에 Application Gateway Ingress Controller 만들기 (0) | 2020.01.28 |
| 14 Terraform을 사용하여 Azure 배포 슬롯으로 인프라 프로비전 (0) | 2020.01.13 |
| 13 Terraform 설정과 구성 - 상태를 Azure Storage에 저장 (0) | 2020.01.06 |
| 12 Azure의 Terraform (0) | 2019.12.30 |